HOW TO TINT WATER-BASED POLYURETHANE
A nice thing about clear, water-based urethane is that it can be tinted pretty easily. Just add some food coloring (you can get almost any color by mixing the standard colors) to get the tint you want, and then apply it. Presto - tints that can match most any covering with practically no weight! You already knew this, but you should try this on a scap piece of balsa and glass to be sure that your “magic mix” will dry with the color you expected…
How to Bag a 4oz Wing
Various folks have written to us suggesting that we have some “magic secret” that allows us to create four ounce wings (and some that are significantly less than 4 oz). Well, nothing could be farther from the truth, and this page will prove it!
How do we get wings that are light? The tradeoff is easy - less glass, less epoxy, and correspondingly less strength. If you try to build a set of wings using these instructions, please be forewarned that wings this light are more fragile. If you tend to “bonk” things on landing, or have a habit of pulling down hard on launch you may fold these up, but if you are getting to the point where things are under control a plane built using these techniques will float noticeably better.
Enough philosophy - here we go! (the following is from an email by Bill reviewing his techniques - by the way the big “technique” is practice bagging many wings)
“What is your secret?” We have no secret at all. The Web-site shows our layup using 1.4 ounce cloth and doublers, and tells you to drop to .75 ounce cloth with doublers if you want a lighter weight wing. The web lay-ups average about 4.1 to 4.2 oz for light .75 ounce cloth, and 4.3 to 4.5 for the 1.4 oz cloth.
My latest wing lay-up for 60" HL is as follows.
- Center core pink foam (Home Depot) 7.25" chord 21"core weight about .63ounces
- Double taper tip panels 1# virgin white foam 7.25 chord to 6.0 to 3.5" X 20" long
- Both panels together weigh .92 ounces.
I use one layer of .75 ounce cloth on all panels, plus full span 3 oz “tacky thread” carbon spars.
The last 15 wings average 3.5 oz Poly, and 3.8 oz Poly- flaperon. (because I use an extra .75 oz doubler on the root end 10" wide over servo cut-outs, and a doubler on top where I will leave the skin hinge for the ailerons.)
The airfoil I have used on these is the 6063 thinned to 6% and cambered to 1.8%
NO SECRETS
If you weigh your epoxy, (as you should every wing to get consistant) you will find that these wings can be bagged with about 1.6 to 1.7 ounces of epoxy for the whole wing. With a total dry weight of 1.8oz poly, & 2.1oz PF you add on the weight of the epoxy (calculations below) of 1.7 oz per wing to get a finished weight of 3.5 to 3.8 ounces.
One of our new first time baggers here just did his first HL wing at 3.3 ounces. He is Tom Miller. Tom came over a few times to learn layup in preparation for his first wing.
How do you measure and weigh your epoxy? Epoxy is the first and only place you look for weight. PERIOD!!
West 1 gal pumps put out 1.25 ounces total for both pumps EZ Lam puts out 1.5 ounces total for both pumps.
How to Weigh Your Epoxy
- Weigh your plastic picnic cup first
- Pump out both resin and hardener into it
- Then weigh it all, and deduct the cup weight.
- Now weigh your 3" foam roller (you made three 3" from one 9" roller to save money like us , didn’t you?)
One pump of resin & hardener from West pumps will easily do your first panel with cloth wetted out.
Wet out your 2oz LE doublers, (start wetting out the cloth by dribbling epoxy dribbles back and forth longways on the top,and bottom right through the .75 ounce cloth), and lay down your carbon tacky thread spars, add your doublers if it is a PF, and start the wet out for the second panel (or third if a three panel wing).
This gets tricky and will only be learned by doing. The roller is already wetted out and you won’t be using near as much epoxy as the first panel. If you mix up a full pump of each, you will be working with the potential to make you second wing panel 1.25 ounces plus what you spread onto the second panel from the first batch.
This means your first panel is laying in the bag at a weight of about 1.75 ounces finished, and you dumped about .2 or so ounces already onto the second panel which already gives it a weight of 1.1 dry, + .2 or total 1.3ounces.
If you use all the epoxy from the second pumping, or 1.25 oz, plus the weight already of 1.3, your second wing half will weigh about 2.55 oz. This results in an un-matched set weighing 4.3.
With a little preparation and calculating, you will have a set of 3.5 ounce wings that match. I see mis-matched wings all the time, there is no secret as you put it, and all the work up sheets in the world can’t help you if you don’t learn the basics to light wings. It took us over 170 wings in a year to learn what we can do in predicting the weight of wings.
Weigh the components, balance them out, learn what epoxy weight to use with each weight or combination of cloth weights and doublers. Dig in and do it, produce your own data.
Once you understand where the weight comes from in bagging, you can start to experiment. My personal wings are bagged for performance/weight/airfoil design. Durability is second. If you build to fly well, you will not survive too many hard crashes.
If you crash alot, and don’t break wings/things, you have built too heavy. Build to Fly.
More later, let me know how you make out, it’s not easy bagging light AND strong.
Bill’s Terminator Bagged Tips
On the wing tips, I make a diagonal cut at 80 degrees from the TE leading inward, then use a 6" radius arc to lay out the curves (do it once on a piece of posterboard and cut the curve section out with sissors).
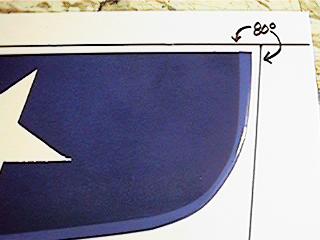
Shape of wing tip - top view
Once you have the mylars cut for the first one, just lay the core in and trace the mylar outline on it to cut the curved tip for the next ones.
Then flip the core over, and sanding CAREFULLY, scallop the underside of the tip down to a uniform 1/8" thickness or so, right from the LE around to where it starts to taper to the TE.
Blend it over the first 2 or 3 inches inboard so that you don’t have an abrupt taper at the tip. Your mylars will conform, and you end up with a very nice laminar flow tip. (but what do I know)
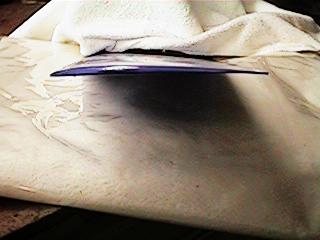
End view of tip after Bill’s ’tip scalloping’ work
We have noticed that shaping the tips before attaching the 2oz leading edge glass cloth strip adds some extra feet to our throw height in reduced drag. At my age, I need all the extra feet I can get. Seems to help tip stalling also. (this ship does not tip stall easily)