The Allegro-Lite 2m
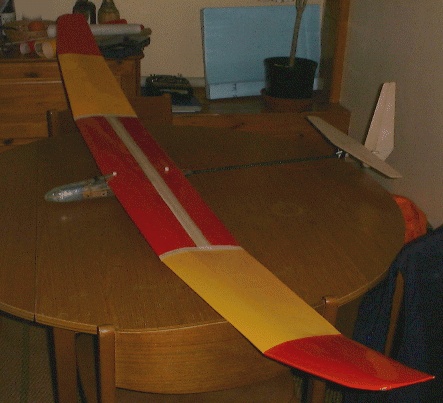
The Allegro-Lite 2m is a built-up version of the original composite Allegro RES 2m sailplane. The intent of the Allegro-Lite is to make the original Allegro’s high performance accessible to builders preferring traditional wood construction. The usual spruce spars are replaced with off-the-shelf carbon fiber strips, but the construction method remains nearly the same. The resulting structure does not quite match the (admittedly excessive) strength of the original Allegro, but it still provides full-pedal zoom capability on the winch. Careful sizing of the spar and all other components has resulted in a very low flying weight of 18 oz.


The exceptionally low weight and low wing loading (5 oz/ft^2) gives the Allegro-Lite great versatility. It can be flown as an oversize HLG, or as a full-pedal winch glider, or anything in between. A mini hi-start will give a very high launch in small fields. It can be ballasted up to 32 oz or more for windy weather. The long tail moments and powerful spoiler provide good landing control for RES contest landing tasks.
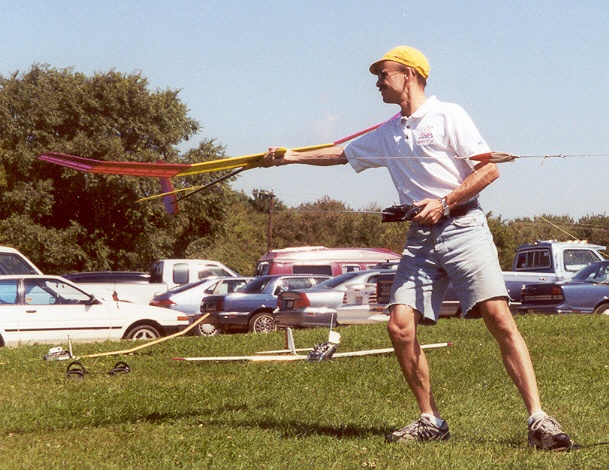
Mark demonstrates winch launching technique for the Allegro-Lite. Once you look at the fuselage plan and think about holding the Allegro-Lite, you’ll quickly realize that the low “wetted area” of the fuse leaves very little to hold on to during launch!
The Allegro-E-Lite 2m
The Allegro-E-Lite is the electric version of the Allegro-Lite RES 2m glider. The same fuselage pod shell is used. The motor replaces the RX battery, and the motor battery is placed in the ballast compartment, so the overall CG location is largely unaffected. The intent is to use the wing and stab of the winch glider with the electric fuselage, with the wing’s spoiler servo being disconnected when flying electric. A dedicated wing without the spoiler will save 1 oz for a 5% increase in climb rate.
The power train is an ungeared 6V Speed-400 motor, a 6x3 folding prop, a 7-cell 600 mAh low rate battery, and a 10-Amp motor controller. This simple and inexpensive setup exploits the clean light airframe, which allows climbing at relatively high speed (about twice the best glide speed), much like with a Zagi-400. A high airspeed partly mitigates the losses of the small prop, and makes the un-geared drive more attractive. Total estimated climb altitude is about 1500 ft, based on the dead air flight times of 25 minutes have which been measured in very still foggy air at dawn.
An optional modification to the prop to improve the blade airfoils gives a noticable (estimated 5-10%) improvement in the climb rate and total altitude gain.
Drawings and Construction Notes
The Allegro is designed for 2m RES (rudder elevator spoiler) competition tasks. The Allegro uses a set of custom-designed airfoils, tuned for the airframe design parameters. Detailed construction notes and target weights are provided in the plans - please pay close attention to these if you wish your Allegro to have the strength it needs, and the performance it should have!
Allegro-Lite Plans
OVERALL PLAN
WING PLANS
Allegro-Lite 2m full-size wing plans (to build over!)
Please note - to create the full size wing plan, cut along the dotted lines of “Sheet 1” through “Sheet 4” with a sharp knife, align the edges and tape with clear tape.
*** It seems that only certain printer setups can handle the single-file version, so if that doesn’t work, use the 8x11" cut and paste approach
SPAR AND JOINER DETAILS
- Allegro-Lite 2m spar details PDF - 9 KB CAD DXF - 159 KB
- Allegro-Lite 2m wing joiner details PDF - 10 KB
- 50% de-rated joiners - for light duty use only! PDF - 10 KB
- IMPORTANT: Wing joiner building instructions TXT - 2 KB
WING RIBS
- Allegro-Lite 2m rib center outlines
PDF - 6 KB
CAD DXF - 101 KB
- Please note - this file contains measured rules in both the vertical and horizontal direction. Before using the printout to cut your ribs, please be sure that your printer has printed the page at the correct dimensions (some printers are not as accurate at this as others…)
- Allegro-Lite 2m rib mid-tip outlines
PDF - 10 KB
CAD DXF - 162 KB
- Please note - this file contains measured rules in both the vertical and horizontal direction. Before using the printout to cut your ribs, please be sure that your printer has printed the page at the correct dimensions (some printers are not as accurate at this as others…)
- DXF files of rib outlines - no kerf Zip of CAD DXF - 71 KB
- Rib Templates PDF - 24 KB
FUSELAGE
Allegro-Lite 2m standard fuselage plan (full size printouts)
- standard fuselage plan page 1 PDF - 27 KB CAD DXF - 392 KB
- standard fuselage plan page 2 PDF - 20 KB CAD DXF - 277 KB
- one-sheet fuselage plan PDF - 34 KB CAD DXF - 488 KB
Allegro-Lite 2m wood fuselage plans
TAIL AND V-MOUNT
- Allegro-Lite 2m tail plan PDF - 21 KB CAD DXF - 273 KB
- Allegro-Lite 2m tail shaping data and diagram - 19 KB (Also see: Accurate shaping of solid balsa surfaces without templates)
- Allegro-Lite 2m stabilizer v-mount diagrams and construction details - 21 KB
- Home-brew v-tail design ideas - plans for aluminum and carbon formed v-tail mounts - 21 KB


Allegro-E-Lite Plans
- Allegro-E-Lite 2m plan PDF - 40 KB CAD DXF - 605 KB
- Allegro-E-Lite 2m electric fuselage plan (full size printouts)
- Graupner CAM 6x3 high performance prop modification - 24 KB
Allegro Construction Notes
- Allegro-Lite 2m panel building sequence - 5 KB
- Allegro-Lite 2m wing building sequence and wing construction details - 11 KB
- Allegro-Lite 2m Fuse Plug Construction
- Accurate Shear Web Cutting
- Allegro-Lite Boom Stiffness - 805 Byte (to aid with selection of a tailboom)
- D-Tube Sheet Forming instructions - 2 KB (how to pre-form the D-Tube sheeting before installation)
- Pushrod Selection - 2 KB (notes from Mark on lightweight pushrods)
- Tail Sanding Sequence - 9 KB (diagrams and notes on sanding the tail feathers)
- Other Construction Tips #1 - 5 KB
- Other Construction Tips #2 - 3 KB
Tail Construction Notes
The 3/16" plank makes the elevator, and the 1/4" plank makes the fin+rudder.
To make the elevator:
- Cut out and sand the elevator to the right planform.
- Carefully make the spanwise cut for the spine, noting the gentle radius in the middle. The radius can be more gentle than on the plan, but I wouldn’t make it sharper.
- Slice off the radiused “point” of the back elevator piece and glue on the hard balsa insert of exactly the same size. Titebond is OK here, but avoid excess oozing onto the soft wood (tough to sand).
- Glue the two elevator pieces together with slow epoxy, sandwiching the carbon spine between them. Chordwise stretched masking tape strips are good for applying pressure all along the seam.
- When cured, sand the elevator to the right spanwise thickness taper, so it has a 5% thick rectangular “airfoil” all along its span.
- Sand in the true airfoil.
To make the fin+rudder:
- Cut out all the 45 degree-grain rudder pieces and glue together. Ambroid is best for this since is sands well on the soft balsa (Duco Cement and Sig-Ment are perfectly good substitutes for Ambroid). Cut out the fin in one piece. The latest tail pdf drawing shows how the pieces fit on the 1/4"x3"x18" plank. Make sure the hinge edges are straight, without any gap between fin and rudder.
- Make the edge slices for the hinge strip with a new #11 blade as shown on the drawing. A 1/4" deep slice is OK – a bit wider than half the hinge strip.
- Sand in roughly a 20 deg bevel on each side of each edge (4 bevels total). This will give a 40 degree rudder deflection clearance. The bevels don’t quite meet in the middle of the 1/4" face at the slice – leave roughly a 1/16" flat spot.
- Squeeze Ambroid into the slices, and make another blade pass to coat the inside of the slices. Also pre-coat the hinge strip with Ambroid. When dry, test-fit the hinge strip into the slices. Widen and/or deepen the slice if necessary. Then squeeze more Ambroid into one slice and install the strip. When set, glue the strip into the other piece the same way, thus joining the fin and rudder. Leave a 0.02"-0.03" gap to allow the strip to flex.
- Apply the basswood or hard balsa laminations to the bottom of the fin+rudder. Wet the strips and glue on with Titebond. Apply tension when pulling them around to prevent compression cracks. Hold down with narrow tape strips.
- Sand the spanwise taper to a rectangular airfoil. Make sure the taper is equal on both sides to the hinge strip stays in the middle!
- Sand in the true airfoil.
Note: The hinge strip is extremely tough, so you can treat the whole vertical tail like one piece of wood during sanding.
Airfoil Coordinates and Polars
The AG35..38 airfoils on the Allegro-Lite have been specially designed for built-up construction. All parts of the airfoil with open covering are flat by design. This completely eliminates the airfoil modifications due to covering sag and thus avoids the associated performance penalties. Wider than usual rib spacing can also be safely used.
Each airfoil has one flat facet on the bottom, and three flat facets on top. Their % chordwise extents are:
| Airfoil | Bottom | Top Facet 1 | Top Facet 2 | Top Facet 3 |
|---|---|---|---|---|
| ag35 | 30%-100% | 45%-65% | 65%-83% | 83%-100% |
| ag36 | 30%-100% | 45%-65% | 65%-86% | 86%-100% |
| ag37 | 30%-100% | 45%-65% | 65%-88% | 88%-100% |
| ag38 | 30%-100% | 45%-65% | 65%-89% | 89%-100% |
The intent is to have the bottom sheeting back to at least 30% chord, and the top sheeting back to 45% chord. A top support strip is to be placed at 65% chord. The trailing edge strip forms the remaining facet back to 100% chord.
The AG35..38 airfoils are similar in some respects to the Selig S3021 airfoil, which also has a flat bottom and was designed for built-up construction. The AG35..38 airfoils are thinner, and perform noticably better at lower Reynolds numbers. Hence they are especially attractive for smaller gliders, where the small thickness is less important from a structural viewpoint.
| Airfoil | Coordinates | CompuFoil COR files | Polars |
|---|---|---|---|
| ag35 | ag35.dat - 4 KB | AG35.COR - 4 KB | ag35_polars.pdf - 31 KB |
| ag36 | ag36.dat - 4 KB | AG36.COR - 4 KB | ag36_polars.pdf - 25 KB |
| ag37 | ag37.dat - 4 KB | AG37.COR - 4 KB | ag37_polars.pdf - 30 KB |
| ag38 | ag38.dat - 4 KB | AG38.COR - 4 KB | ag38_polars.pdf - 24 KB |
| ht08 | ht08.dat - 4 KB | HT08.COR - 3 KB | tail section 1 |
| ht12 | ht12.dat - 3 KB | HT12.COR - 3 KB | tail section 2 |
Polar Comparisons
- Comparison: ag37, ag35, s3021 (re100k) - 21 KB
- Comparison: ag37, ag35, s3021 (re70k) - 20 KB
- Comparison: ag37, ag35, s3021 (re50k) - 19 KB
Related Construction Notes
- Ultra-light tail construction
- Integrated cloth hinge design
- Accurate shaping of solid balsa surfaces without templates
Allegro-Lite Materials Lists
The following may not be 100% complete, but should provide a great start on finding the materials to build your Allegro. Please let us know about anything we’ve missed…
- Allegro-Lite Materials - Wood - 11 KB
- Allegro-Lite Materials - Composites - 11 KB
Best of luck, and please let us know how you’re doing with your Allegro-Lite 2m!