Note (July 2023): The majority of links and references are no longer active. Here are a few found resources.
- WayBack: The Rotary Driver System
- WayBack: RDS Description
- WayBack: RDS Instructions
- WayBack: RDS Sources
- Kimbrough Products Servo Coupler
[Courtesy of Harley Michaelis, AMA 3234, LSF 023 - 10/4/98; original HTML conversion by Joel Foner]
Rotary Aileron Driver System (RADS)
An all-internal rotary driver system for moving surfaces
This system eliminates any need for horns, screws, nuts, backplates, clevises, keepers, straight pushrods, tube-in-tube pushrods, pull-pull cables, bellcranks, exit guides, etc. Nothing can get ripped off. Nothing contributes any slop. If servos center well & hinges, etc. allow free movement, there is a return to a well-defined neutral from either direction. The system works in most any size or kind of R/C aircraft, where separate servos are used for ailerons, flaps, or where tail pieces will accept a servo & leads.
Any modeler with ordinary tools and materials can make parts & install as I do. The essential items are (1) a splined Coupler that mounts over an output gear, (2) a Pocket in the surface & a (3) Drive Shaft between. Angles involved are 45 & 90 degrees, relative to the hingeline.
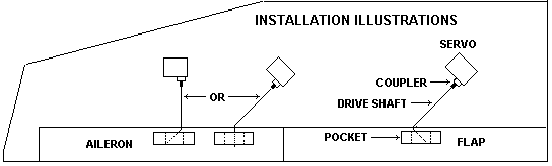
As a shaft rotates, the surface deflects & the shaft also slips slightly fore-aft within the Pocket. This avoids any binding due to the Pocket not being in line or in plane with hinges. A 90 degree bend is used for flap & 45 for other applications and provide expected deflections, if nothing else limits motion. Pockets need not be laterally centered in a surface. More inboard locations keep mass more centered in the airframe & puts servos where a wing is usually thicker for easier mounting, especially in thin wings.
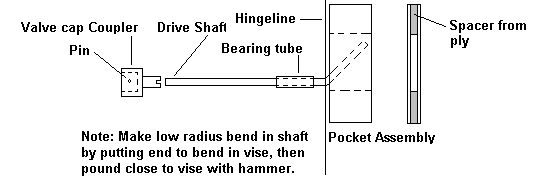
The sketch below shows the elements closer to full size. The Coupler can be made from a solid brass (not a thin shell) “screwdriver type” valve cap, in which a hole is drilled through the skinny end, in which to bond the shaft. For hand launch applications, splined sockets can be made in a special nylon bolt (click here for details). Tru-Flate item 47-103, found at independent auto supply retailers, is just right. Using epoxy, a socket is custom-splined to fit the output gear. A 3/32" drive shaft (4-40 rod, etc.) works for medium to large airframes. A nicer material is stainless steel “filler rod” found at welding suppliers. 1/16" is also available. HLG guys could use smaller music wire.
Click Thumbnail Below For Full Size
COUPLER: Drill 3/32" hole thru cap. For smaller shaft, shim later with bits of tubing, CA’d. Coat servo case top & gear with PVA, Pic Slicker, paste wax, Chapstick, etc. Fill screw hole with wax. As needed, round end of a piece of 4-40 rod, etc., to just seat in the hole. Wax rod. Run cap onto it to center around gear. With cap against case, temporarily bond to rod with tiny bit of CA. Fill cap about 2/3 with quick epoxy. Avoid bubble. Press to case, hold a few minutes. Let cure well. Pull off, take out rod. Clean parts.
Here are some ideas for making the RADS coupler (click here for more info)
POCKET: Make from thinner, non-textured laminate (Formica, Nevamar, Wilsonite, etc.) used to face kitchen cabinets. (Free samples at building supply). Spacers are ordinary aircraft ply, uniformly sanded for a snug fit to the shaft. Thin CA bonds parts. Put smooth side of laminate inside. Make pockets 1/2" x 2" or so, with spacers 1/2" square. For HLG’s, miniaturize. Locate servos close to the hingeline as practical to keep shafts short to minimize flex. Then locate pockets laterally, setting front edge back 1/16" from the hinge pivot line. Where possible, place Pocket near top surface if top-hinged or near bottom if bottom-hinged & so shaft bent end (5/8" to 3/4" long) is laterally centered in the slot. For sheeted frame surfaces, mount Pocket inside the sheeting on a broad base of thin (1/64" etc.) ply.
FOAM CORE STRUCTURES: Make snug opening for Pocket. Epoxy in, flush to one surface. Fill to other side. On bottom of cores, before skinning, outline servo with Coupler attached. Well needs 1/4" or so clearance at Coupler end, so it can slipped off the gear. If bagging, fill Pocket with waxed soft balsa and seal anywhere epoxy could meander. Prepare templates (outline on clear plastic, mylar, etc.) to show precise servo/well cover perimeters, relative to reference points on the structure. Make pinholes at key points. If skin is removed 1/8" or so beyond well, you have a cover to tape back. Be sure you have reference marks to know where to cut hingeline. Cut skin. Router wells. In neutral, the notch in the cap should be accessible. As needed, orient the servo to align axes of shaft & Coupler. This may require tilting with a beveled base of balsa under the servo base or servo. Easy way to mount is to remove ears, & (a) epoxy a ply base in the well with rails spaced to fit at case ends, then secure case with a bracket of .030 aluminum fitted over case to rails, or (b) cut a well to snugly fit the case, wrap servo in masking tape or heat shrink tubing & secure with dabs of silicone adhesive or 3M77. To remove, slit wrap.
DRIVE SHAFT TUNNEL: Cut flaps & ailerons loose. Clear Pockets of any waxed fill put in. Use long drill bits, etc. to work tunnels toward the Couplers. For 3/32" shafts, bits of telescoping plastic or aluminum tubing down to 1/8" ID can be epoxied into the tunnels, as bearings, just ahead of the bends. 1/8" OD nylon can be slipped on the shaft ahead of the bend. Carefully angle & locate bearings so coupler & shaft axes align & so surfaces align well with wing. A useful tool in installing bearings is a piece of 3/32" rod CA’d into a length of 1/8" OD brass tube. Keep it waxed to avoid bonding the bearing to it. When partially set, remove tool, insert real shaft and slip on the aileron or flap to final check the alignments.
DRIVE SHAFT LENGTH: When ready to hinge, size to length so with 3/8" inserted in the cap, the elbow lays just ahead of the hingeline. Mark shaft at 3/8". Heavily rough that end & insert. If 3/32" hole fits rod too tightly, open with #41 bit so CA can thoroughly wick around it. Bend point (elbow) location & 1/16" pocket setback avoid prying as surface moves. Put shaft & servo in neutral.
SHAFT BONDING: Be sure the hole in the cap is free of all traces of CA used to temporarily bond the rod while making the splines. To avoid inadvertent bonding of cap and gear, again apply PVA, wax, etc. to the gear. With shaft inserted to the mark made on it and everything in neutral, wick fresh thin CA between shaft and cap by applying it at the notch. Excess should drip out, but could work to the forward end of the hole and maybe around the gear. . .hence the PVA. Allow hours (yes, hours!) for the CA to fully cure. Cap can be pried off and repositioned like an output wheel. When all is finalized, drill a 1/32" hole through cap and gear for a pin to retain cap.
HINGING: Clear continuous tape hinge material works well, but apply a few “Z” hinges at either end first to keep surfaces aligned to wing. Bottom skin will need to be notched ahead of hingeline to allow full down rotation of flap shaft. For servicing a servo, cap can be pried off and servo removed.
RUDDER, etc. Mount servos near hingeline. Shafts can be very short.
RETROFITTING IN ARFS: As needed, reshape wells to install servos. Where possible, route leads into any precut lead grooves. Fill old well gaps with scrap foam. Remove enough skin beyond filled-in areas so old & new foam can be bridged with new skin. Level new foam to the old. Attach new skin with epoxy, bagging when possible . . . or otherwise smooth, fill, paint. If film is used, cover with matching or contrasting color, trim material, etc. Work a tunnel under skin. Remove foam from surface to mount Pocket. Seal around it to avoid plugging opening with epoxy as it is mounted.
PLUG-IN-TIPS: See my website at ~~~http://www.rc-aero.com/lsf023/~~~ 1 for how this was handled on my GENIE sailplane. On request, I will e-mail that part of actual building text. e-mail me at hmlsf023 “at” bmi.net. Some material here is more recent than that contained in the website, reflecting new things learned.
MAINTENANCE: Apply a little powdered graphite inside a slot. Occasionally blow out to keep clean.
RC aero no longer appears to be active. ↩︎