This web page is meant to be a bulletin board for tips and advice on building and flying the Zagi THL as a hand launch glider. If you have something to add, please contact us with information. A BIG THANKS to John Gallagher who put this page together and maintained it through many updates.
Building Tips
Building (John Gallagher)
Building a THL probably won’t be a problem. Just follow the directions and think LIGHT. Don’t use more poly tape than absolutely necessary. Keep the tape overlap small (1/8"). If you buy an extra roll of poly tape, you can make the bottom a different color than the top for better visibility. Add a small piece of tape to hold the front edge of the coroplast tips against the wing.
Be careful with the white foam (non epp) part of the wing. Pressing on the surface of the foam will produce finger depressions. Use a covering iron on low heat setting to remove the depressions. Move the iron over the spot without letting the iron stop or you will melt the foam and make it worse.
The instructions tell you to use a tape hinge the full length of the elevons on the top, but only three strips of hinge tape on the bottom of the elevons. If done this way, grass and dirt will enter the untaped sections of the bottom of the elevon hinge line and ruin the bond on the top hinge tape. So, tape the complete length of the elevons on the top and bottom. Make sure you roughen the surfaces (wing’s colored packing tape and elevon surface) before you place the hinge tape to ensure a good bond. The hinge tape should not be more than 1 1/2" wide. Cut if necessary.
Balance the wing between 8" and 8 1/2" back from the nose. In my opinion, the optimum is at 8 1/4".
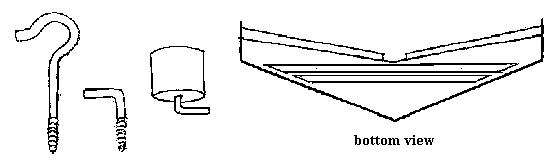
If you are going to use the THL as a handlaunch, you will need to install two plastic chair cups on the bottom surface of the Zagi to use as finger holes.


Tom Nagel passed this on to me. These chair cups are normally used on the bottom of metal chair legs to prevent scratching a floor surface. Most hardware stores carry them in 1/2" and 3/4" sizes. Pick the size that fits your fingers (the two middle fingers). You throw the THL by putting the two middle fingers in the chair cup holes and using the other two fingers to help balance the wing and your thumb wrapped around the leading edge. After the THL is built place your hand in position and mark where the holes should be placed. I used a soldering iron to burn in the holes. Use white aliphatic glue or Epoxy to hold the cups in. Heights of 30+ feet are easy using these chair cups for launching
My THL weighs just over 11 ounces with the recessed and lighter pushrod setup. This is with a 270 mah battery, FMA S-95 servos, and a Hitec Focus III AM receiver.
Battery (Scott McGuire)
A 270MAH pack will balance a THL out better. I have a 110MAH with a heap of lead under it, so if you need the weight you may as well have a longer flying time.
Elevons(Scott McGuire)
The wooden Aileron thingies that came with my kit were garbage. One was light balsa, the other depleted uranium heavy. One day when I’ve got time I’ll replace with a balanced pair of medium strength balsa. Maybe then I can remove the 6 nails I have in the left hand outer panel to balance it.
Suggested Trim Procedure: (John Gallagher)
Follow the directions for adjusting the reflex of the elevons. Make sure both elevons are at the same angle with the transmitter trim buttons set in the middle.
If you are a novice, adjusting the trim on the THL is a difficult and critical part of setting up a THL for flying. Get help if you can find it. A poorly trimmed THL will fly terrible. A well trimmed THL will be a joy to fly. With a moderate throw, the THL should glide forward straight and level. If it wants to dive into the ground, you need to adjust the trim button down one or two clicks. If it balloons up and then dives for the ground (stalls), you need to adjust the trim button up one or two clicks. Keep test gliding and adjusting the vertical trim until it doesn’t stall. Then adjust the trim button down one click at a time until the glider begins to stall. Then back off on the trim one click (one click up).
If the glider wants to turn right or left it is best to adjust at the pushrod.
- If it turns right, shorten the left pushrod clevis one turn at a time until the glider flies straight.
- If the glider wants to turn left, shorten the right pushrod clevis one turn at a time until the glider flies straight
Tow Hook (John Gallagher)


Don’t punch holes in the bottom of the Zagi to install a tow hook anchor plate. It is much easier to take some 1/16" (or smaller) piano wire and bend it into a large Z-bend with the hook at the front end. Two 9" long pieces of 2" wide strapping tape will firmly attach the hook to the underside of the Zagi. This method has the added advantage of being removable without leaving any extra weight for handlaunching.
Bent Coroplast Tips (John Gallagher)
After a number of sessions on a local slope, one of the coroplast tips on my THL was bent like an accordion. I taped a bamboo skewer to the outside of each coroplast tip to keep them straight.
The 9 Ounce THL (JG)
When I decided to build my second THL, it had to be as light as possible. My nine ounce goal was reached.
The first major difference from stock was the use of Ultracote Lite to cover the Zagi instead of the relatively heavy tape that came with the kit. This covering is transparent and extremely thin.
Because I didn’t believe that this covering would provide the same strength as the tape would have, I put two strips of 2" filament tape across the bottom of the wing from the leading edge of one side to the leading edge of the other side. The first one is placed just ahead of the trailing edge at the point of the vee and the second piece is placed just ahead of the first. This creates a sort of fiberglass spar cap on the bottom of the wing. Put a single strip of 2" filament tape on the upper surface running across the wing and centerred about 8 " back from the leading edge.
Use the 3M Super 77 adhesive on the raw foam for a good bonding surface for the Ultracote Light. I used two pieces of covering - one for the right side of the wing and one for the left. The covering goes from the bottom trailing edge around the leading edge to the top trailing edge, overlapping 1/2 inch both top and bottom. Use a sealing iron to attach the covering, starting at the leading edge. Warning: Do not use a heat gun on this thin covering. The white foam will melt first before the covering tightens. Even the sealing iron must be on a low heat setting or the foam will melt.
The second change from stock was the wing tips. I used meat-tray-foam covered with clear tape, instead of the coroplast wing tips. The foam wingtips are half the weight of the coroplast, and the packing tape covering adds a great deal of strength. The elevons were coated with CyA instead of painting them. The pushrods were hidden (see advanced tip) Radio Gear - Hitec Focus III receiver, FMA S-80 servos, 225mah battery. With the radio gear moved as far forward as possible, the glider balanced at 8-1/4 inches back.
For those who think that 9 ounces is the lightest a Zagi could be, think again. The elevons (after sanding to shape) weigh 1/2 ounce apiece. If this could be cut in half, a 110mah battery could have been used with a resulting weight very close to 8 ounces! The question is how light is too light. The lightweight THL doesn’t penetrate as well and doesn’t throw as high but it does climb in lift better than a heavy THL. When the wind is 12 mph or over, I’d fly the heavy THL or add ballast.
UPDATE: I’ve just finished THL #4. The RTF weight is 9.9 ounces. It has a carbon tube spar and is coverred with Econokote. Econokote is close to the weight of the zagi tape, but stays better looking and requires less maintenance (twigs tend to find their way into the overlaps of the tape). The carbon spar is an old avia sport 220 which is about 7/32" diameter. This spar alone added about .6 ounce to the all-up weight, but the spar is a good idea if you plan to highstart the THL. Without it, the wing, over time, will get mushy/flexible to the point that it will flutter on launch. Zagi #4 has a permanent tow hook (see below) and does not have chair cups. I found that it is easy to hand launch the THL by placing my thumb against the front of the tow hook and my fingers on the trailing edge between the elevons.
Permanent Towhook(JG)
Someone on the RCSE mentioned this method of installing a tow hook in a foamie sloper. It worked with my Zagi THL. Buy a 3/4" hardwood dowel from your local building supply store, and cut off a piece 3/4" long. For the hook I used a screw hook (1/8" thick) that had to be cut shorter and bent to shape.
If you just try to screw the hook into the end of the dowel, the dowel will split so drill a pilot hole the length of the screw threads in the end of the dowel. About 6-1/2" back from the nose, burn a hole in the bottom of the wing using a soldering iron. The hole should be a snug fit for the dowel. I used white ‘Gluit’ aliphatic glue to glue the dowel in place. You can jam thin scrap pieces of EPP into any gaps between the dowel and the hole to ensure a tight fit. Soak the scrap pieces of EPP in glue first. Wait at least a day for the glue to dry. Epoxy will probably work as well. I don’t know which would be lighter.
High Start Grip (James C. Deck)
I launch my Zagi THL from a std. hi-start. Sixty paces gives a good launch - more makes for flutter. I glued a thin plastic sheet on the bottom rear where I grasp the plane to prevent finger dents and used a small piece of adhesive-backed sandpaper on both top and bottom to ensure a good grip. Only problem with the Zagi THL is that it’s so much fun that my other sailplanes don’t get flown when I take it along.
High Start Grip Addendum (JG)
This has to be done before the covering is applied. When I high start, I grip the center section of the trailing edge. In order to prevent the crushing of this trailing edge center section, I epoxied two layers of fiberglass to the top and bottom. Cut two pieces of 2 1/2" by 6" fiberglass (medium weight/1.5 ounces). Make a cut half the length of each piece so that you have two three inch strips at the bottom of each piece of fiberglass.
Put one of the pieces of fiberglass on a piece of wax paper and squeegie on 15 minute epoxy using a single edge razor blade. Lightly scrape off as much of the epoxy as possible. Lift one edge of the piece of fiberglass and peel it off the wax paper. Place the uncut half on the bottom of the THL’s center section trailing edge and fold the strips over to the top. This will result in a 2 1/2" by 3" section on the bottom and two vee strips on the top.
After the epoxy sets, take the second piece of fiberglass and do the same thing applying the fiberglass starting on the top of the center section. This not only reinforces against crushing but also reinforces the center section trailing edge, which can be used for hand launching (see UPDATE above). After covering, I used James C. Deck’s idea to glue a small piece of sandpaper on the bottom. It really helps.
Flying Tips
Flying Quirks (John Gallagher)
My Zagi has a tendency to nose up when you initiate a turn. This is a problem when you are flying at minimum speed (thermalling speed) and will produce a stall. It can also cause a mush condition (partial stall) with a loss of roll control. This may be just a condition of my glider and not the normal situation. If your Zagi does the same thing, let me know. To alleviate the problem, I’ve developed the habit of pushing forward stick before initiating a turn.
I can’t say enough about the THL’s ability to bounce back after a not-so-perfect landing. I fly the THL on days when it is so windy I wouldn’t think of flying my balsa gliders.
When properly trimmed it should be easy for a novice with no experience, to learn to fly this glider.
Hi-Starts (John Gallagher)
Buy a mini-histart or upstart with 1/8" rubber.
The problem with highstarting a Zagi is that there is no easy way to hold the THL against the pull of the hi-start while stretching the rubber. Grasping the trailing edge between the elevons doesn’t allow much pressure without causing deformation of the soft and thin white foam. For a while I taped on some 1/16" plywood top and bottom. These plywood grasp plates helped, but they are not a solution to the problem. I had been using a Dynaflite upstart with 1/4" rubber. This size rubber produces a great deal of pull when stretched.
When I switched to an upstart with 1/8" rubber the problem was solved. This size rubber has less pull. To make up for less pull, the upstart manufacturers put a longer length of 1/8" rubber in their upstarts. This results in the same launch height whether you are using the 1/8" or the 3/16" rubber upstart. The launch using the smaller diameter rubber upstart is gentle and slow, allowing a novice the time to make whatever minor control corrections that are necessary during the launch to keep the glider flying straight.
High-Start Launching (Matt Olson)
Hold stretched towline in left hand; Zagi in right hand. Hook towline ring onto tow hook. Slowly transfer tension to tow hook, keeping tow line close to the bottom of the Zagi. Hold Zagi with first two fingers (index and “give the finger” fingers) on top of Zagi’s nose area, thumb on the bottom, and other two fingers (ring and pinkie) loosely around towline. Caution: Don’t let the Zagi start to yaw; the towline tension will RAPIDLY yaw the airplane and whack whatever is within reach of a wingtip (like your ear!). Pick up the transmitter (duh). Release the Zagi with a backhanded motion at an upward angle of about 45 degrees.
High-Start Launching (Charles French)
I saw your website and want to mention on how I launch my THL with a up-start/bungee. I simply hold it from underneath the ZAGI at about waist level. Grasping the tow hook and tow ring.
Hand Launching (Scott McGuire)
I used 2 pieces of aluminum cut from a coke can shaped in a V taped at the rear TE to stop the crushing when launching. Seems to have worked ok so far. I launch by having the glider flat in my palm with three fingers hooked over the TE. I keep the nose down so that when I run, the glider pushes against my wrist until the final moment when I point the nose up and fling. I haven’t seen anyone else with a zagi or a HLG for that matter, so it’s hard to say how well it launches.
Advanced Modifications
Recessed pushrods (John Gallagher)


The exposed pushrods of the THL cause aerodynamic drag and reduce both the glide and climb of the glider. For those who are confident in their building abilities, it is a good idea to recess the servos and servo arms below the surface and use recessed pushrods (in pushrod tubes) which exit into the airstream a few inches in front of the elevon control arms. The colored packing tape is used to cover the servo openings. You can use 1/32" piano wire in 1/16" plastic tubing (Sullivan Gold-N-Cable #507). In addition, this mod gives the Zagi a more stealthy look.
For recessed servos, I used FMA S-90 servos, with servo arms cut down to 1/2" long. Make your cutout for the servos deep enough that the top of the servo arm is just under the surface of the covering. To cut a tunnel for the pushrod tube, take a 8" length of straight 1/16" diameter piano wire. Flatten the end of the wire using sandpaper, top and bottom. Starting just behind where the servo arms will be, push a hole towards the control horn on the elevon. Turn the wire as you push. You’re aiming to break out through the covering about 3 inches in front of the elevon control horn. The 1/16" plastic tubing should start just behind the servo cutout and exit from beneath the covering three inches in front of the elevon horn and should continue to about 3/4" in front of the horn. I use a z bend in the pushrod wire to connect to the horn. The horns are made of 1/16" plywood and are glued into a slot cut into the leading edge of the elevons.
Fun With Winglets (Tom Nagel)
For the last several months I have been experimenting with my Zagi-THL, trying different kinds of winglets. Here is what my notes show, for what it’s worth.
I started with fairly large winglets, made from styrofoam sheet stiffened with tape strips, more vertical and more rectangular than the triangular shape Jerry ships with his kits. Size: 4 3/4" long, 6 1/2" tall, chord tapering to 2 1/2" at the top. Twenty-four square inches each. The winglets ended at the wing-elevon hinge line. The plane sloped well, but thermal turns were hard to do, and I couldn’t achieve thermal flight from a handlaunch. Sometimes, while attempting to thermal if I turned too tight or slowed down too much, the THL would go into a death spiral. Bummer.
In an effort to lighten the ship and achieve hand-launchability, I decreased the size of the winglets and the plane still sloped and tracked fine; I got one decent handlaunch thermal flight. And the death spiral problem seemed to go away. Tight thermal turns were still difficult. Size: 4" long by 4 1/2" high, tapered to 3" at the top. Fifteen square inches each.
I decided to try moveable vertical fins, attached to the elevons, the theory being that since the hinge line of the elevons is not perpendicular to the Zagi’s center line (ie, swept wing) a vertical fin attached to an elevon would achieve some “toe-in” as the elevon came up. And the fin on the “down” elevon would be mostly out of the airflow. I made two light balsa “elefins” in a sort of T shape, and taped one to each outboard end of the elevons. I left the small winglets in place. The elefins were 2 1/4" tall and 3" long, sheet 1/16th balsa.
I couldn’t tell much difference in the model’s flight. All I learned was that the elefins held up pretty well, and were easy to tape on.So, I ripped off the winglets, and flew with elefins only. I was able to handlaunch and highstart launch with no problems. I was surprised to see that the Zagi still tracked and turned with only the tiny (size) elefins as verticals, maybe 7 square inches each. And I decided that I was not seeing any great increase in turning ability. Maybe the elefins were too small.
Just for fun, I tried flying the THL with NO WINGLETS AT ALL. It launched on a high-start just fine, but was difficult to fly. I couldn’t hand-launch at all without fins. It would be interesting to see just how little vertical surface is enough to fly with. But I wasn’t after “enough”-I was after “optimal.”
I made bigger elefins. They were about the size of a playing card, 3" long by 4" vertically, about 12 square inches each. The plane flew and turned well, but started to “Zagi-bop”–it would flutter on launch, with the elevons vibrating. Apparently the larger elefins added too much mass out there on the elevons.
I started using a new shape of the smaller fixed winglets: a 1" fence extends along the chord of the wingtip, back about 2/3 of the chord, then the winglet becomes a vertical rectangle which extends back over the chord of the elevon. (About 19 square inches each.) The major change here is that the winglets now extend back across the elevon chord. I got good turns and good control, and the Zagi-bopping stopped. I got a 9 minute thermal flight.
My current theory is that both the wing-tip fence and the elevon-capping vertical fin are necessary for decent performance. The vertical needs to be back as far as possible, and block the end of the elevon as well as the end of the wing. A sufficiently picky builder might be able to combine the elefin idea with a low wing-tip fence, perhaps using a quarter-circle forward extension of the elefin to mate with the wing tip fence, and build the whole thing without too much of a drag penalty. I am not talented enough to accomplish that.Currently I am using “ruddered” winglets on my Zagi- THL. I made a square-butted vertical cut in the winglets described in (7) above. The cut is right at the end wing’s trailing edge, at the junction with the LE of the elevon. I used a strip of tape to hinge the ruddered part to the fixed part. It is free to flop outboard only, prevented from flopping inboard by the elevon and the square-butted hinge line. Each of the two ruddered sections has a triangle shaped piece of very light music wire taped to the trailing bottom inboard corner; when the elevon comes up, the wire triangle pushes the rudder out.
The light music wire is from the high notes on a hammered dulcimer. You only need a few inches. Check your guitar shop. Make this shape__/|__then bend each of the legs 90 degrees in or out and tape the “triangle” into place after you have your Zagi trimmed out. The / part of the wire triangle needs to touch the outboard edge of the elevon near the trailing edge when the elevon is is normal glide position. There is no significant weight or drag penalty and the ruddered winglets seem to help the thermal turns a lot. The THL still flys slope just fine, even inverted.
Other experiments:
- I had a whole stack of leftover stryofoam winglets made up for Zagi experiments. I had never been happy with my handlaunch Gnome. I think I got the shape of the wing tips wrong when I built it. I cut off the rounded wingtips, squared up the ends of the wings, and taped on a more or less vertical set of winglets. It became a much nicer flyer, with a lower stall speed and groovier turns.
- My buddy Travis has a TG-3 with square wing tips. He was having trouble setting up thermal turns and getting short thermal flights. I taped on a set of leftover Zagi winglets. Since the wing tips on the polyhedral TG-3 were cut perpendicular to the bottom of the outboard panel, these winglets had a an odd-looking inward lean. Stealth TG-3. Nevertheless, the stall speed seemed to drop, and the plane began to fly more smoothly. Travis began to thermal up, where before he had just been gliding down.
- All of these winglets are just taped on with double- sided scotch tape between the wing and winglet. Sometimes I add a piece of single sided tape on the wing bottom, for security. I have yet to see one of these blown off or flutter even on a vigorous winch launch, except in cases where the tape or winglet had been messed up by a previous crash landing. Replacement is easy. Sheet strofoam is easy to come by–grocery store meat trays and restaurant carry out boxes are good sources. Give it a try!